众所周知,国内知名框架 Dubbo 底层使用的是 Netty 作为网络通信,那么内部到底是如何使用的呢?今天我们就来一探究竟。
1. dubbo 的 Consumer 消费者如何使用 Netty
注意:此次代码使用了从 github 上 clone 的 dubbo 源码中的 dubbo-demo 例子。
代码如下:
System.setProperty("java.net.preferIPv4Stack", "true");
   ClassPathXmlApplicationContext context = new ClassPathXmlApplicationContext(new String[]{"META-INF/spring/dubbo-demo-consumer.xml"});
   context.start();
    // @1
   DemoService demoService = (DemoService) context.getBean("demoService"); // get remote service proxy
   int a = 0;
   while (true) {
       try {
           Thread.sleep(1000);
           System.err.println( ++ a + " ");

           String hello = demoService.sayHello("world"); // call remote method
           System.out.println(hello); // get result

       } catch (Throwable throwable) {
           throwable.printStackTrace();
       }
   }
当代码执行到 @1 的时候,会调用 Spring 容器的 getBean 方法,而 dubbo 扩展了 FactoryBean,所以,会调用 getObject 方法,该方法会创建代理对象。
这个过程中会调用 DubboProtocol 实例的 getClients(URL url) 方法,当这个给定的 URL 的 client 没有初始化则创建,然后放入缓存,代码如下:
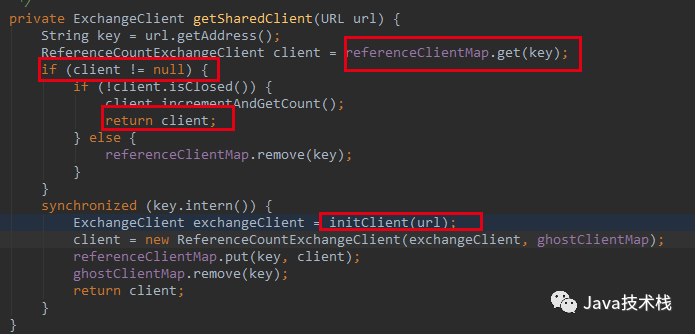
这个 initClient 方法就是创建 Netty 的 client 的。

最终调用的就是抽象父类 AbstractClient 的构造方法,构造方法中包含了创建 Socket 客户端,连接客户端等行为。
public AbstractClient(URL url, ChannelHandler handler) throws RemotingException {
   doOpen();
   connect();
}
doOpent 方法用来创建 Netty 的 bootstrap :
protected void doOpen() throws Throwable {
   NettyHelper.setNettyLoggerFactory();
   bootstrap = new ClientBootstrap(channelFactory);
   bootstrap.setOption("keepAlive", true);
   bootstrap.setOption("tcpNoDelay", true);
   bootstrap.setOption("connectTimeoutMillis", getTimeout());
   final NettyHandler nettyHandler = new NettyHandler(getUrl(), this);
   bootstrap.setPipelineFactory(new ChannelPipelineFactory() {
       public ChannelPipeline getPipeline() {
           NettyCodecAdapter adapter = new NettyCodecAdapter(getCodec(), getUrl(), NettyClient.this);
           ChannelPipeline pipeline = Channels.pipeline();
           pipeline.addLast("decoder", adapter.getDecoder());
           pipeline.addLast("encoder", adapter.getEncoder());
           pipeline.addLast("handler", nettyHandler);
           return pipeline;
       }
   });
}
connect 方法用来连接提供者:
protected void doConnect() throws Throwable {
   long start = System.currentTimeMillis();
   ChannelFuture future = bootstrap.connect(getConnectAddress());
   boolean ret = future.awaitUninterruptibly(getConnectTimeout(), TimeUnit.MILLISECONDS);
   if (ret && future.isSuccess()) {
       Channel newChannel = future.getChannel();
       newChannel.setInterestOps(Channel.OP_READ_WRITE);
   }
}
上面的代码中,调用了 bootstrap 的 connect 方法,熟悉的 Netty 连接操作。当然这里使用的是 jboss 的 netty3,稍微有点区别。点击这篇:教你用 Netty 实现一个简单的 RPC。当连接成功后,注册写事件,准备开始向提供者传递数据。
当 main 方法中调用 demoService.sayHello(“world”) 的时候,最终会调用 HeaderExchangeChannel 的 request 方法,通过 channel 进行请求。
public ResponseFuture request(Object request, int timeout) throws RemotingException {
   Request req = new Request();
   req.setVersion("2.0.0");
   req.setTwoWay(true);
   req.setData(request);
   DefaultFuture future = new DefaultFuture(channel, req, timeout);
   channel.send(req);
   return future;
}
send 方法中最后调用 jboss Netty 中继承了 NioSocketChannel 的 NioClientSocketChannel 的 write 方法。完成了一次数据的传输。
2. dubbo 的 Provider 提供者如何使用 Netty
Provider demo 代码:
System.setProperty("java.net.preferIPv4Stack", "true");
ClassPathXmlApplicationContext context = new ClassPathXmlApplicationContext(new String[]{"META-INF/spring/dubbo-demo-provider.xml"});
context.start();
System.in.read(); // press any key to exit
Provider 作为被访问方,肯定是一个 Server 模式的 Socket。如何启动的呢?
当 Spring 容器启动的时候,会调用一些扩展类的初始化方法,比如继承了 InitializingBean,ApplicationContextAware,ApplicationListener 。
而 dubbo 创建了 ServiceBean 继承了一个监听器。Spring 会调用他的 onApplicationEvent 方法,该类有一个 export 方法,用于打开 ServerSocket 。
然后执行了 DubboProtocol 的 createServer 方法,然后创建了一个NettyServer 对象。NettyServer 对象的 构造方法同样是 doOpen 方法和。
代码如下:
protected void doOpen() throws Throwable {
   NettyHelper.setNettyLoggerFactory();
   ExecutorService boss = Executors.newCachedThreadPool(new NamedThreadFactory("NettyServerBoss", true));
   ExecutorService worker = Executors.newCachedThreadPool(new NamedThreadFactory("NettyServerWorker", true));
   ChannelFactory channelFactory = new NioServerSocketChannelFactory(boss, worker, getUrl().getPositiveParameter(Constants.IO_THREADS_KEY, Constants.DEFAULT_IO_THREADS));
   bootstrap = new ServerBootstrap(channelFactory);

   final NettyHandler nettyHandler = new NettyHandler(getUrl(), this);
   channels = nettyHandler.getChannels();
   bootstrap.setPipelineFactory(new ChannelPipelineFactory() {
       public ChannelPipeline getPipeline() {
           NettyCodecAdapter adapter = new NettyCodecAdapter(getCodec(), getUrl(), NettyServer.this);
           ChannelPipeline pipeline = Channels.pipeline();
           pipeline.addLast("decoder", adapter.getDecoder());
           pipeline.addLast("encoder", adapter.getEncoder());
           pipeline.addLast("handler", nettyHandler);
           return pipeline;
       }
   });
   channel = bootstrap.bind(getBindAddress());
}
该方法中,看到了熟悉的 boss 线程,worker 线程,和 ServerBootstrap,在添加了编解码 handler 之后,添加一个 NettyHandler,最后调用 bind 方法,完成绑定端口的工作。和我们使用 Netty 是一摸一样。
3. 总结
可以看到,dubbo 使用 Netty 还是挺简单的,消费者使用 NettyClient,提供者使用 NettyServer,Provider 启动的时候,会开启端口监听,使用我们平时启动 Netty 一样的方式。
而 Client 在 Spring getBean 的时候,会创建 Client,当调用远程方法的时候,将数据通过 dubbo 协议编码发送到 NettyServer,然后 NettServer 收到数据后解码,并调用本地方法,并返回数据,完成一次完美的 RPC 调用。
好,关于 dubbo 如何使用 Netty 就简短的介绍到这里。
来源:https://www.cnblogs.com/stateis0/p/9062171.html
声明:本站所有文章,如无特殊说明或标注,均为本站原创发布。任何个人或组织,在未征得本站同意时,禁止复制、盗用、采集、发布本站内容到任何网站、书籍等各类媒体平台。如若本站内容侵犯了原著者的合法权益,可联系我们进行处理。